Ambush at Winter’s Teeth Pass

Peering into the valley below, Kiknik and Chompa snarled at the sight of the Dwarfen caravan and its mercenary escort crawling across the bottom of the snow-chocked basin. The Warboss knew he had to strike quickly once the caravan was in position, for it would soon pass within reach of a fortified outpost that guarded the trade route. Needing little encouragement from his rider, Chompa let out a blood-chilling howl that echoed across the valley – signalling Kiknik’s warriors to being their attack.
Historical Recreation
The Ambush at Winter’s Teeth Pass was fought between Kiknik’s Nomadic Waaagh! and a Dwarfen trade caravan and their allies from the Empire. to represent this, the players should write three muster lists (one for the attacker and two for the defender) as follows:
The Attacker: The attacker should write a single 2,5000 points muster list using the Nomadic Waaagh! Army of Infamy composition list. The General of this army must be Kiknik Toofsnatcha.
Defenders: The defender should write two muster lists, one representing the guards of Chief Engineer Thundrid Ironbrow and the other, and allied contingent representing their mercenary company escort.
Dwarfen Guards: The defender should write a 1,000 points muster list using the Dwarfen Mountain Holds Grand Army composition list found in Forces of Fantasy. This force must include a Dwarf Engineer who must be the army’s General.
Empire Escort: The defender should write a 1,5000 points muster list using the Empire of Man Grand Army composition list found in Forces of Fantasy
Alternatively, this scenario may be played with any armies of the players choosing. If so, the attacker should write a single 2,500 points muster list. The defender should write two muster lists, one of 1,000 points and another of 1,500 points.

Set-up: This battle takes place at the bottom of the snow-choked Winter’s Teeth Pass: a mountain road with steep cliffs on either side. The battlefield should be left fairly barren, with only a few rocky outcroppings and areas of raised ground placed sporadically across the battlefield. There should also be an open road, approximately 6″ wide, running down the centre of the board from east to west.
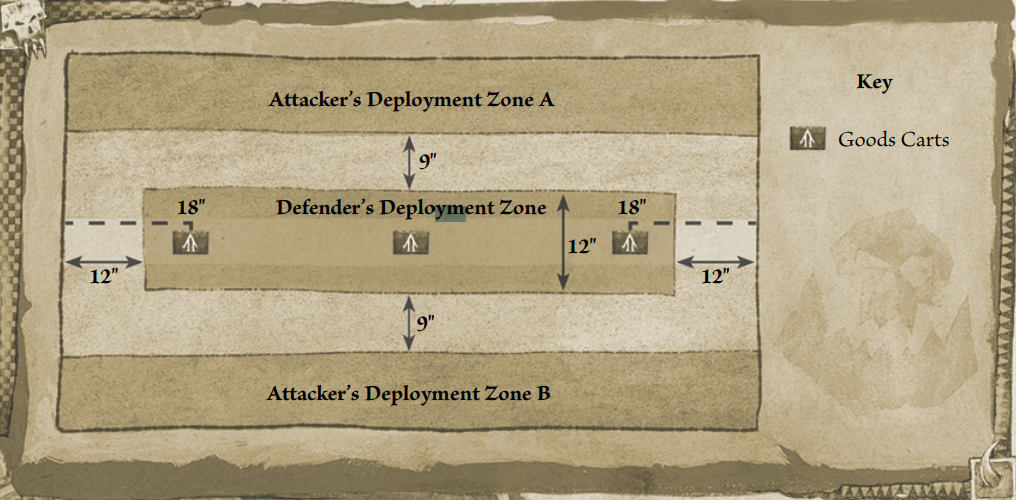
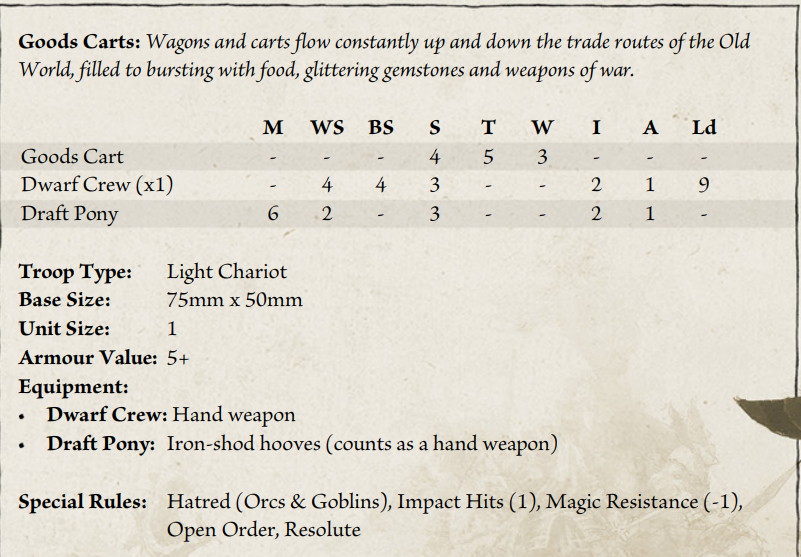
Deployment: The defender begins by deploying three Goods Carts as shown on the map. Next, they deploy their entire army anywhere within the defender’s deployment zone as shown on the map. Then, the attacker splits their army into two roughly equal halves; one of which is deployed anywhere within attacker’s deployment anywhere within the attacker’s deployment zone B as shown on the map.

First Turn: In this scenario, the attacker will automatically take the first turn.
Game Length: The battle will last for 6 rounds, until one side concedes, or until the time limit agreed by the players is reached.
Scenario Special Rules
Late Snows: Any unit whose troops type is infantry cannot march unless they are on the open road way that runs across the centre of the board. In addition, Goods Carts my not march unless they are on the open road.
Fleeing to Safety: Should any part of a unit in the defending player’s force, or any of the Goods Carts, move into contact with, or cross beyond the eastern edge of the battlefield it is removed from play but is not destroyed. The unit has successfully escaped the ambush and is well on its way to the safety of the outpost.
Victory!: Once the battle has ended, use Victory Points to determine which player is the winner, as described in the Warhammer: the Old World rulebook. In addition, at the end of the game:
- The defending player win a bonus 100 Victory Points for each Goods cart that escapes the battlefield via the eastern table edge. Gains an additional 100 Victory points if the Dwarf Engineer escapes the battlefield via the eastern table edge.
- The attacking player wins a bonus 100 victory points for each goods cart they have destroyed. 100 victory points if Kiknik Toofsnatcha slays the Dwarf Engineer.